Deploy a simple application from a zip, WAR or EAR archive
Uploading lots of tiny files via FTP is such a slow and painful process. Enscale gives you a much faster way to quickly deploy your application – just upload the whole archive.
For Java applications, that means you can just upload your WAR or EAR file and get Enscale to deploy it for you. For PHP applications, you can package your application in a zip archive and let Enscale do the work. Let’s check just how simple the deployment process is.
Deployment steps
Log in to your Enscale dashboard
Ok, it’s obvious, but to get started you need to Log In to Enscale. We’re going to assume that you’ve already created a new Enscale Java or PHP environment with your choice of application server. If you haven’t, just hit New Environment and do that now.
Upload to the deployment manager
First you need to upload your archive to the deployment manager. Open the upload dialog using the ‘Upload’ button in the Enscale dashboard (highlighted below):

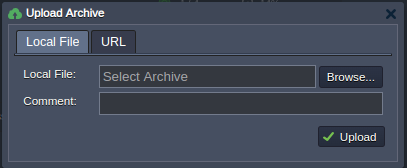
Then you get a choice; you can either upload a local archive straight from your own computer:

To do this, just click Browse, locate the file on your computer, and (optionally) write a little comment to help you to identify this archive more easily in the deployment manager listing later.
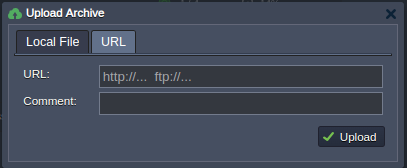
Alternatively you can upload a remotely hosted archive from somewhere on the Internet:

Here you need to write the URL where the archive is hosted on the Internet, which can be using http://, https://, or ftp:// protocols. Again, you can (optionally) write a little comment to help you to identify this archive more easily in the deployment manager listing later. This option can be really useful for some open source projects, such as WordPress, who kindly publish a nice simple download link at http://wordpress.org/latest.zip – so you can just grab their latest stable package and transfer it directly to your deployment manager without even downloading it to your own computer first!
You can upload archives (via either method) up to 150MB this way. Please contact our support team for assistance if your project archive is larger than 150MB.
If your URL is secured with a username and password, you can just include it within the URL like ftp://user:password@ftp.server.com - this should work for FTP, and also for HTTP basic authentication. Unfortunately if your archive is behind a more complex user authentication system you will need to download it to your own computer first and then upload it manually.
Deploy your code
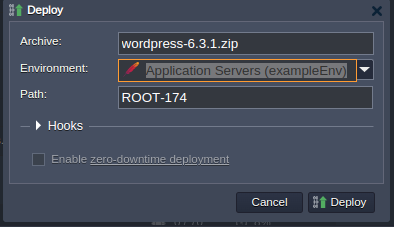
Once your upload has completed, you are ready to deploy your code to the application server. All you need to do here is click on the deployment button next to the archive you wish to deploy, and select which environment you’d like to deploy it to:

Working with individual files
There are times when you might need to add or edit a single file. WordPress is a good example, since you need to rename / edit the wp-config-sample.php to wp-config.php for the application to work, so let’s take a quick look how to do that as well.
First we need to open the file manager, which is part of Config for the application server (since you can also access and edit the application server’s own config. files this way; e.g. httpd.conf for Apache). Expand your environment view to reveal the Apache server, and click on the Config button:

In the window below you’ll see a file tree open up. Since we deployed to the ROOT context (i.e. directly into http://example1.j.layershift.co.uk/) in this example rather into than a sub-folder, our deployed files live in webroot/ROOT. To upload an individual file (e.g. wp-config.php) just click the folder cog and click the upload button to upload an individual file from your computer:

However, in this case WordPress already provide a sample config file that we can just edit and rename to wp-config.php so that’ll be easier:

Select the file (wp-config-sample.php), and edit it in the right-hand pane. When you’re done editing, don’t forget to press the Save button at the top!
To rename it, once again select wp-config-sample.php, and then click on the rename button next to the file name. Type your new name, and then hit Enter to save it.