Transferring a gTLD to Layershift
Layershift currently support the registration or transfer of the following domain names:
- .com
- .org
- .net
- .info
- .biz
- .us
- .eu
- .ca
- .mobi
- .me
- .in
- .co
- .asia
- .io
- .cool
- .guru
- .ninja
- .rocks
For .uk domain transfers please see the related article: Transferring a .uk domain name to Layershift
Any of these domains can be transferred to your account with Layershift free-of-charge. However, ICANN rules require that the domain is renewed for 1 year as part of the transfer process. So you will need to pay an early renewal fee, which will basically extend the domain registration by 1 year.
What you need to do at the current provider side
-
Obtain EPP transfer code from your existing registrar. The EPP code or Domain Authorization Code is usually a (up to) 16 characters code assigned by the registrar in order to provide an extra security measure. This code ensures that a domain can only be transferred by the domain owner and not by a malicious third party. You will not be able to continue with a domain transfer until you receive the Authorization Code from your current registrar.
-
Ensure that any transfer locks at your registrar are removed/unlocked. In most of the cases, the registrars lock the domains automatically to protect them from unauthorized transfers. You need to contact your current registrar or use your registrar’s domain management tools to unlock your domain before you initiate the transfer, otherwise the transfer will fail.
What you need to do on Layershift side:
Once you’ve made sure that you have successfully completed all the steps mentioned above, please follow these guidelines to complete the transfer process:
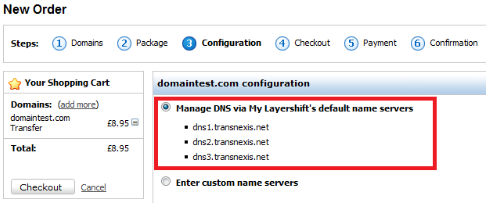
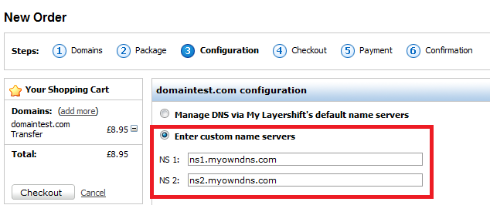
1.Go to our website to initiate the transfer: UK-hosted subscriptions (paid in GBP) or US or Singapore-hosted subscriptions (those paid in USD) 2.You will need to switch to Transfer Domains Mode, fill in the domain(s) you wish to transfer then follow the wizard to place the order and submit the payment. 3.Select the desired DNS records in the Step 3 of the transfer order. The nameservers you enter in this step will only be set after the transfer is completed.
Layershift DNS cluster:
In this case you have to choose the first option – Manage DNS via My Layershift’s default name servers:
- DNS1.TRANSNEXIS.NET
- DNS2.TRANSNEXIS.NET
- DNS3.TRANSNEXIS.NET

Custom nameservers
If you wish to keep your existing DNS records or add other custom ones, select the Enter custom name servers option and fill in the NS records manually.

Additional Note: You can check the nameservers using an online whois check tool (e.g.this Whois Lookup), but please note that it may include cached information.
4.After placing the order, a transfer request is submitted to your existing registrar which they need to respond to that request (i.e. either releasing the domain or rejecting it) within 5 days.
The whole transfer process for a domain transfer can take anything from a few hours to around 5 days. This varies depending on the (losing) registrar involved.
There is no downtime for your domains during this process, because nameservers settings should remain unchanged throughout.
Check your domain nameservers are accurate
Your domain name will be using the nameservers you entered during the transfer order. If you wish to update these details you can do this via our Layershift control panel:
- Login to Layershift Customer Control Panel .
- Use the drop-down
Subscriptionon the right corner of the screen and selectAll My Domains. - Open
All My Domainstab. - Click on the domain name you have just transferred (or any other domain you want to change nameservers on).
- Open the
Name Serverstab. - Click
Editand enter the nameservers required. You have three choices:- Custom Nameservers (recommended for Cloud VPS and Dedicated customers)
- Our redundant DNS cluster (recommended for shared hosting)
- External DNS servers (not recommended). For a full explanation on the nameservers options, please check our related article: Setting up DNS for your domains Additional Note: Repeat from step 3 if you have multiple domains.
Our systems will immediately send a request to the domain name registry to update your nameservers, and this is usually completed within 5 minutes. You may need to wait for your ISP or your computer to expire their DNS cache (this occurs automatically) before you can see your domain name pointing at our servers, but usually this does not take more than a few hours.