How to preview your site using the ‘Hosts’ file
Contents
What is a hosts file?
A hosts file is basically an address book which is consulted every time you browse (or connect) to a domain. It acts by converting user friendly address names (e.g. www.layershift.com) to their corresponding IP address which aren’t that easy to recall. If the address is not found within your hosts file then the request is passed to your configured DNS server(s) to be resolved.
Where can I find it?
Depending on the operating system that you use, the hosts file can be found at various locations:
- Microsoft Windows: C:\Windows\system32\drivers\etc\
- Apple Macintosh / Linux-based distributions: /etc/hosts
What do I do with it?
By editing your local hosts file you can force your computer to load a domain from the IP address that you specify, you can get the IP address for your site from within your Plesk Control Panel.
It’s extremely useful as it can allow you to view development or test sites to fix any potential bugs or problems without making the site ‘live’ by altering any DNS zones. It’s important to note that altering your hosts file will only affect your computer and not the live sites!
When editing your hosts file there are some simple rules to follow:
- Each entry should be on a separate line.
- The IP address should be in the first column.
- The domain name should be in the second column.
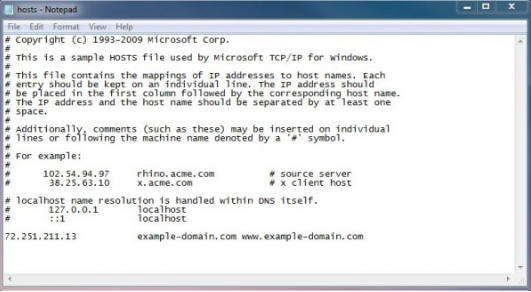
In order to set your custom IP mappings, simply open the hosts file using your preferred text editor and add in your IP address(es) and corresponding domain(s) following the rules outlined above. Below is an example using the Layershift domain:

In the example, after saving the file, your browser will be automatically directed to the ‘72.251.211.13’ IP address when navigating to either ‘example-domain.com’ or ‘www.example-domain.com’ . Once you’re done working on the development or test sites, you’ll need to remember to remove the entries from the hosts file and save it in order to access the live sites again.
How can I make sure it’s the new server?
After editing and saving your hosts file, your browser should automatically make new requests for content to the new server / IP address that was specified. However, you can always double check the server IP content is loaded from by using Developer Tools in your browser.
Below you can find the steps for checking this in Google Chrome.
- Open a new tab in Google Chrome.
- Open the Developer tools by pressing Ctrl + Shift + I.
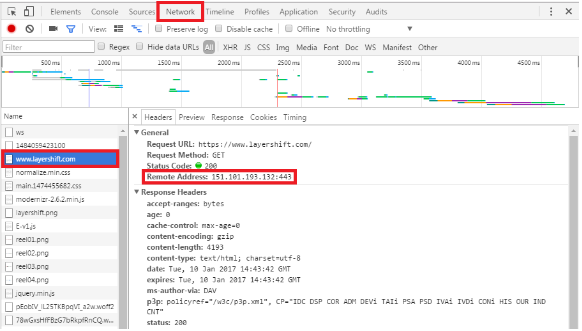
- Go to the Network tab in the Developer tools menu and open your website (
example-domain.com) - Click on your domain name (
example-domain.com) in the Name column in the populated list. - Verify the origin server IP for the resource at Remote Address.

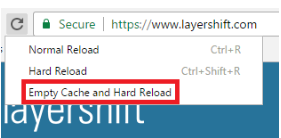
With Developer Tools still open, you can go one step further and make sure you’re not seeing anything cached by your browser: provided that Developer Tools is open, you can right-click on the reload button in Chrome to find an Empty Cache and Hard Reload option:

If you prefer to use Mozilla Firefox, you can use Ctrl + Shift + E to open the Network tab of developer tools directly, which works in a similar way.