Transferring a .uk domain to Layershift
Contents
Layershift are Nominet members and currently support the registration or transfer of the following .uk domain names:
- .uk
- .co.uk
- .me.uk
- .org.uk
- .ltd.uk (only available to Private Limited Companies in the UK)
- .plc.uk (only available to Public Limited Companies in the UK)
Any of these domains can be transferred to your account with Layershift free-of-charge until your domain expiration date. Once you reach this date you can renew the domain name with us at our current pricing for a further 2 years.
To transfer non-.uk domains please see the related article: Transferring a gTLD to Layershift
Transfer the domain to our Nominet account
Nominet have a system where moving domain names between providers simply requires you to update the IPS Tag of the domain. Our IPS Tag is LAYERSHIFT.
- Login to your current domain registrar’s control panel.
- Select your domain name.
- Look for an option like
Transfer Domain Away,Change IPS Tag,Change Nominet Tag” orChange Provider`. - Enter our IPS Tag (LAYERSHIFT) and follow the wizard to complete the process.
If you run in to any problems with this process, we recommend you contact the domain registrar you are attempting to transfer the domain name from, as this process can vary between domain registrars. Once the IPS Tag update request is created, most providers perform this automatically within an hour, but in some cases they can impose delays which can result in this taking longer – this is entirely unnecessary but unfortunately standard practice for some domain registrars!
In rare cases, providers do not perform this request when asked – you are within your rights to login to Nominet’s website directly and to ask them to transfer your domain to a new registrar. The charges for this (paid directly to Nominet) are £10 + VAT at the time of writing this article, but for an up-to-date confirmation and instructions on how to do this please check Nominet’s website.
Associate the domain with your Layershift account
Once the domain name has been transferred to us, you need to link the domain name to your account so you can manage it via Layershift Customer Control Panel.
- Login to Layershift Customer Control Panel .
- Open the ‘Home’ tab at the top of the page.
- In the ‘Domain Management’ section, click ‘All My Domains’.
- Click ‘add domain.’
- A link will appear to our Store to “transfer a domain” – enter your domain and complete the order wizard to initiate the transfer;
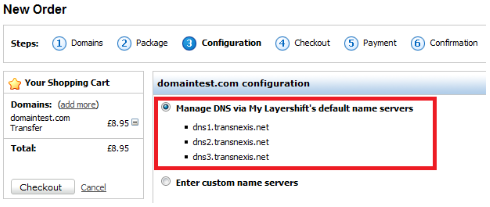
- Select the desired DNS records in the Step 3 of the transfer order. The nameservers you enter in this step will only be set after the transfer is completed.
Layershift DNS cluster:
In this case you have to choose the first option – Manage DNS via My Layershift’s default name servers:
- DNS1.TRANSNEXIS.NET
- DNS2.TRANSNEXIS.NET
- DNS3.TRANSNEXIS.NET

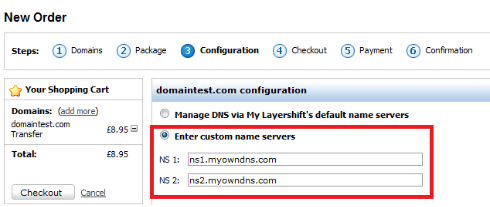
Custom nameservers
If you wish to keep your existing DNS records or add other custom ones, select the Enter custom name servers option and fill in the NS records manually.

Additional Note: You can check the nameservers using an online whois check tool (e.g.this Whois Lookup), but please note that it may include cached information.
4.After placing the order, a transfer request is submitted to your existing registrar which they need to respond to that request (i.e. either releasing the domain or rejecting it) within 5 days.
The whole transfer process for a domain transfer can take anything from a few hours to around 5 days. This varies depending on the (losing) registrar involved.
There is no downtime for your domains during this process, because nameservers settings should remain unchanged throughout.
Check your domain nameservers are accurate
Your domain name will be using the nameservers you entered during the transfer order. If you wish to update these details you can do this via our Layershift control panel:
- Login to Layershift Customer Control Panel .
- Use the drop-down
Subscriptionon the right corner of the screen and selectAll My Domains. - Open
All My Domainstab. - Click on the domain name you have just transferred (or any other domain you want to change nameservers on).
- Open the
Name Serverstab. - Click
Editand enter the nameservers required. You have three choices:- Custom Nameservers (recommended for Cloud VPS and Dedicated customers)
- Our redundant DNS cluster (recommended for shared hosting)
- External DNS servers (not recommended). For a full explanation on the nameservers options, please check our related article: Setting up DNS for your domains Additional Note: Repeat from step 3 if you have multiple domains.
Our systems will immediately send a request to the domain name registry to update your nameservers, and this is usually completed within 5 minutes. You may need to wait for your ISP or your computer to expire their DNS cache (this occurs automatically) before you can see your domain name pointing at our servers, but usually this does not take more than a few hours.